Introduction
Most bar owners start in the wrong place. They collect inspiration images, pick a countertop material, fall in love with a lighting fixture — and then try to fit the equipment around the aesthetic they've already committed to mentally.
That sequence produces bars that photograph beautifully and operate poorly. The ice bin ends up three steps from the mixing surface. The bartender aisle is six inches too narrow. The plumbing rough-in doesn't align with the equipment that arrived six weeks after walls went up. Those mistakes aren't cosmetic — they cost money to fix after opening, and some can't be fixed at all.
A commercial bar that works does two things at once: it functions like a production environment and feels like a destination. Getting there means making decisions in the right order — layout, equipment, and concept clarity before the mood board, not after.
This guide covers five commercial bar design directions that succeed on both counts, along with the layout logic and build sequencing that makes each one work in practice.
Key Takeaways
- Design from the inside out: equipment placement determines structure; finishes come last
- Layout type (straight, L-shape, U-shape, island) drives bartender efficiency, seating capacity, and guest flow
- The back bar and working zone together determine service speed — get these right before anything else
- Design style should express a clear brand concept, not be chosen arbitrarily after the floor plan is set
- The right integrated design partner prevents the most expensive errors: late equipment specs, materials that don't match renderings, and contractor gaps
Before You Design: What Actually Makes a Commercial Bar Work
A commercial bar is a production environment first. Before a single finish is selected, the bar needs to handle a specific drink volume during peak service, support bartender movement within a tight zone, and meet local health code requirements.
The Inside-Out Principle
Equipment determines structure. The position of the ice bin, speed rail, sinks, glass rinser, and POS terminal drives every downstream decision:
- Underbar equipment placement defines bar die dimensions
- Bar die dimensions determine the bar top size
- Bar top size dictates the millwork scope
- Millwork scope sets what finishes are even possible
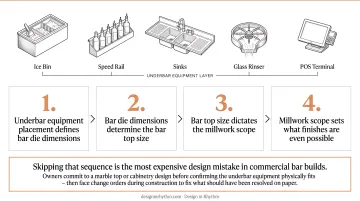
Skipping that sequence is the most expensive design mistake in commercial bar builds. Owners commit to a marble top or cabinetry design before confirming the underbar equipment physically fits — then face change orders during construction to fix what should have been resolved on paper.
The Bartender Working Zone
Krowne Bar Systems describes it plainly: placing an ice bin in the wrong location adds 2–3 steps for every drink served. Multiply that across a full service period and you have a real bottleneck built into the bar permanently.
The working zone — the 18–24 inch deep production area directly in front of the bartender — must be planned before any decorative decisions are made. Within that zone, the triangle of ice, spirits, and mixing surface needs to stay as compact as possible. Every inch added to that triangle costs service time.
Concept Clarity Before Layout
The type of bar you're building determines everything downstream:
- Craft cocktail bar — lower volume, precision-focused station setup, premium material investment
- High-volume sports bar — longer bar runs, multiple stations, durable and forgiving material palette
- Hotel lobby bar — open sightlines, social activation, island or peninsula layout consideration
- Wine bar or tasting room — display-forward back bar, intimate seating, lower equipment load
Concept clarity is a layout decision. Lock it down before the floor plan begins.
Top 5 Commercial Bar Design Ideas
Each of the following represents a complete design philosophy, not just a surface finish. The best outcomes come from committing fully to one direction and executing it consistently across materials, lighting, seating, back bar display, and spatial flow.
Idea 1: The Elevated Cocktail Lounge
This style performs best where dwell time and spend-per-head are the primary metrics — boutique hotel bars, members' lounges, high-end restaurant bars. Guests aren't cycling through; they're staying.
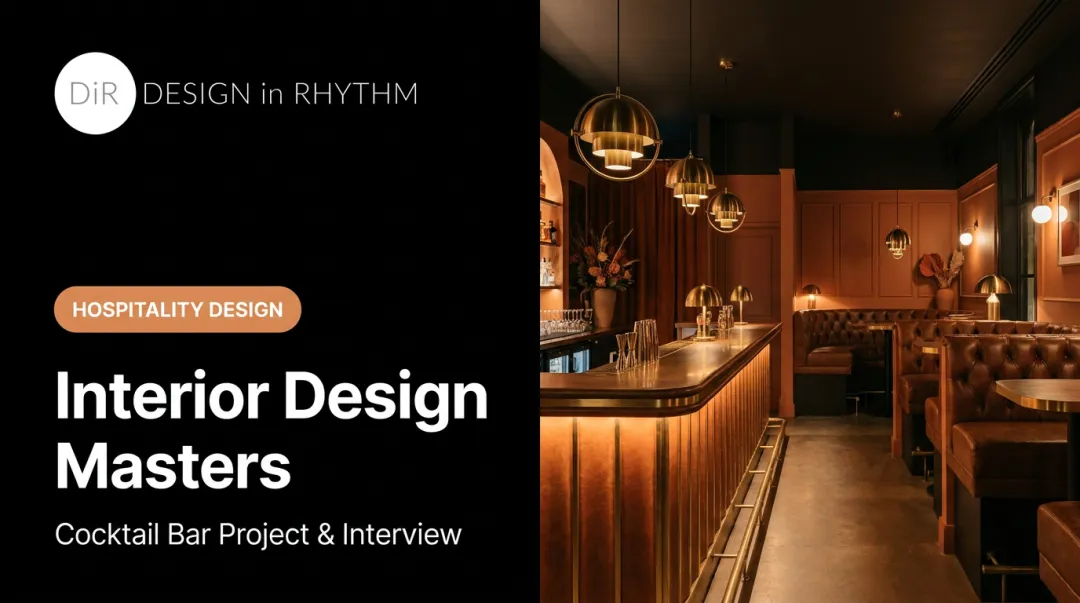
Aesthetic: Marble or stone bar tops, brass or brushed gold hardware, warm ambient lighting layered across pendants and subtle toe-kick illumination, upholstered bar seating, and a back bar built around displaying premium spirits as a visual anchor.
Functional decisions that make it work:
- Typically one or two precision-focused bartender stations rather than a long multi-station run
- Generous counter overhangs (12–16 inches on the guest side) to create intimacy at the bar
- Back bar shelving with pin or integrated LED lighting that treats the bottle collection as a display, not just storage
- Concealed underbar equipment to maintain the visual cleanliness of the counter
Design in Rhythm's work on St Felix in Las Vegas reflects this approach directly: a marbled bar top, illuminated shelving with dramatic purple accent lighting, and layered lighting across distinct seating zones. At Dragonfly in Hollywood, the firm used tufted upholstery, curated back bar illumination, and chandelier fixtures to balance contemporary and classic details.
Idea 2: Industrial-Modern Bar
Aesthetic: Exposed structural elements — brick, concrete, raw metal — warm Edison or filament lighting, reclaimed or dark-stained wood bar tops, blackened steel shelving, and unfinished ceilings.
This style reads as approachable and high-energy, and it works across a wide range of venue types: restaurant bars, standalone cocktail bars, craft beer-focused concepts.
Why this style suits higher-volume operations:
- The raw material palette is inherently durable and forgiving of heavy use
- Open warehouse-style layouts support longer bar runs and multiple bartender stations
- The aesthetic scales naturally — a 10-seat bar and a 60-seat venue can share the same design language without the larger space feeling diluted
- Exposed infrastructure (ductwork, conduit, plumbing) can be incorporated rather than hidden, reducing finish costs
Scratches and patina read as character rather than damage — a practical advantage in high-traffic environments where polished stone or lacquered millwork would require constant upkeep.
Idea 3: Rustic Craft Bar
Aesthetic: Reclaimed wood surfaces, natural stone (slate, honed granite, travertine), copper or aged brass bar tops and fixtures, exposed wooden beam ceilings, warm layered lighting.
This works particularly well for wine bars, craft distillery tasting rooms, farm-to-table restaurant bars, and any concept where the brand story centers on provenance or craft. The materials need to tell that story themselves.
Material and maintenance considerations:
- Natural stone bar tops require sealing; the Natural Stone Institute notes that quality sealers carry a 10–15 year life expectancy when properly applied
- Reclaimed wood surfaces must be treated for commercial use — the FDA Food Code has specific provisions around wood as a food-contact surface
- Copper bar tops develop a patina over time, which can be a deliberate feature or a maintenance consideration depending on how it's managed
- Authentic materials are the difference between a concept that reads as genuine and one that reads as themed — laminates won't hold up under that scrutiny
Idea 4: Open-Concept Social Bar
Aesthetic: The bar positioned as the centerpiece of the room with no visual barriers between bar and dining or lounge areas. Island or peninsula layouts allow multi-directional guest engagement. Dramatic overhead lighting or suspended glassware features draw the eye upward, and the back bar doubles as a room divider or feature wall.
This approach fits hotel lobby bars, rooftop venues, and restaurant concepts where the bar is the primary social activation point — the reason guests gather, not just where they order drinks.
Planning complexity:
Island and peninsula layouts require floor utility lines — water, drain, electrical — running through the floor slab. That must be resolved at the architectural stage. Retrofitting plumbing and drains after construction is one of the most expensive mistakes in any bar build.
Bartender visibility also increases dramatically in this format. Perlick's Bar Design Guide recommends placing cocktail stations on most sides of an island bar for service efficiency. The working zone must be exceptionally well-organized — the bartender is performing in full view from every angle.
Idea 5: Minimalist Contemporary Bar
Aesthetic: Monochromatic or tonal palette (whites, grays, warm nudes), seamless cabinetry with integrated storage, concealed refrigeration, flush bar top edges, and understated lighting that creates atmosphere without calling attention to fixtures.
This style works in modern boutique hotels, urban cocktail bars, and commercial spaces where the architecture itself is the design statement. The bar doesn't announce itself — it belongs.
Execution demands:
Minimalist design has zero tolerance for visual clutter. Every bottle, glass, and tool needs a designated, concealed storage position. That means the back bar and underbar storage must be more thoroughly planned than in any other style — not less.
Custom millwork and integrated refrigeration are nearly always required to achieve the seamless result this style demands. Design in Rhythm's Arclight Theater Bar in Boston reflects that sensibility: smooth stone countertop, sleek open shelving, rounded pendant lighting, and light upholstered bar stools — a space oriented around social interaction rather than decorative complexity.
Layout Types and Key Dimensions for a Commercial Bar
Common Layout Types
| Layout | Best For | Trade-Off |
|---|---|---|
| Straight/Linear | High efficiency, single bartender zone | Limits seating sides |
| L-Shape | Corner spaces, dual service zones | Requires station duplication at corner |
| U-Shape/Horseshoe | Maximum guest seating | Bartender travel increases at ends |
| Island | Hotel lobby bars, social venues | Requires floor utility rough-in |
| Peninsula | Open concept with wall anchor | Compromise between island and linear |
| Service Bar | Back-of-house, server-only | No guest-facing design considerations |
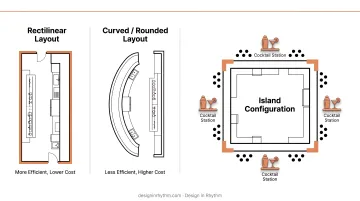
Perlick's published guidance confirms that rectilinear layouts are more efficient and less expensive than curved or rounded forms. Island configurations serve guests on all sides but require cocktail stations positioned on each service face to maintain speed.
Reference Dimensions
These are manufacturer-published specifications — not universal code standards. Verify adopted local codes before finalizing drawings.
- Bartender working surface height: 32.5 in (Krowne Bar Systems specification)
- Underbar equipment depth: 24–26 in (Krowne BarFlex standard depths); 18.5–24 in (Perlick TS and TSF series)
- Back bar refrigeration depth: 24.75 in (Perlick BBR remote series)
- Guest-facing bar top height: Typically 42–44 in (industry convention; verify with equipment vendor)
- Bartender aisle width: 36 in minimum for single bartender; 48+ in for dual bartender operations
Getting these numbers right before construction begins matters more than most operators realize. Once built, dimension errors are built in. The most common mistakes:
- Aisle too narrow — bartenders collide, service slows at peak hours
- Bar top too wide — ice bin and speed rail are out of reach without moving
- Ice bin too far from mixing surface — across a full service shift, that's hundreds of wasted steps per bartender
A deliberately tight working zone lets a single bartender produce more drinks per hour without burning out.
Back Bar Design
The back bar functions as both a storage system and the primary visual anchor of the space. It should be designed simultaneously with the underbar — they operate as one integrated system.
Key considerations:
- Separate bulk storage, daily-use storage, and display zones
- Refrigeration positioned so it doesn't break up the bottle display
- Glassware stored below shoulder height for safe, fast retrieval
- Lighting that makes the bottle collection a feature, not just an inventory
Must-Have Equipment for a Commercial Bar
Equipment must be specified before the bar die and cabinetry are built. The structure is built around the equipment — not the other way around.
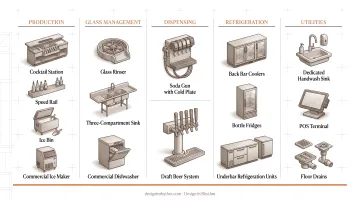
Essential equipment by function:
- Production: Cocktail station, speed rail, ice bin, commercial ice maker
- Glass management: Glass rinser, three-compartment sink, commercial dishwasher (high-volume venues)
- Dispensing: Soda gun with cold plate, draft beer system where applicable
- Refrigeration: Back bar coolers, bottle fridges, underbar refrigeration units
- Utilities: Dedicated handwash sink, POS terminal, floor drains
Ice Sizing
Hoshizaki's industry guidance sets the baseline at 3 pounds of ice per seat per day for bars and cocktail lounges. That figure also needs to account for ambient temperature — Manitowoc's published data shows that rated ice output can drop by 17% or more when ambient air reaches 100°F, a real concern for Las Vegas venues or any bar without adequate HVAC in the equipment area.
Under-specifying ice capacity is one of the most operationally damaging errors in a bar build. When ice runs out mid-service, the bar stops — drinks stop, revenue stops, and guests notice.
Code Compliance
The FDA Food Code provides the national model framework, but local jurisdictions adopt and amend it independently. Los Angeles County, for example, requires a three-compartment bar sink with compartments at least 10 × 14 × 10 inches with two integral drainboards. Southern Nevada Health District has its own specific provisions for sink placement and indirect waste drainage.
Pull your local health department's bar-specific requirements before finalizing any layout. Retrofitting plumbing after walls are up costs far more — in time and money — than addressing it at the planning stage.
From Concept to Opening: The Design and Build Process
The Eight-Step Sequence
- Define service model and concept — volume, guest type, bartender count, brand direction
- Establish floor plan and utility locations — rough-in positions must be confirmed at this stage
- Validate clearances and layout type — aisle widths, equipment footprints, guest circulation
- Specify underbar equipment and working zone dimensions — this determines the bar die
- Design back bar and seating — simultaneously, not sequentially
- Select materials and finishes — aligned with concept, not chosen in isolation
- Plan plumbing and electrical rough-in — before any construction begins
- Execute in correct sequence — rough-in first, equipment second, finishes last
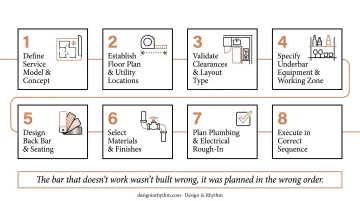
Sequencing failures cause more commercial bar underperformance than construction errors. The bar that doesn't work wasn't built wrong — it was planned in the wrong order.
Realistic Timeline
Build timelines vary significantly based on permit jurisdiction, project complexity, and equipment lead times. Los Angeles plan check assignments can take weeks for complex commercial projects; Las Vegas routine reviews target one to two weeks for non-structural work. Custom underbar fabrication and draft beer system installation add lead time that owners consistently underestimate.
Plan for equipment lead times before you set an opening date — not after.
The Case for an Integrated Design Partner
Most commercial bar builds don't fail during construction. They fail during coordination. The gaps that derail projects typically look like this:
- Equipment specified after millwork is already fabricated
- Materials in the rendering that don't match what actually ships
- Contractors managing conflicting vendor timelines with no single point of accountability
Design in Rhythm structures its boutique hospitality and commercial bar work to close those gaps at the source. Every product is sourced before renderings are produced, so what clients approve in the design phase is exactly what gets installed.
The firm's four-phase model (Dream, Visualize, Source, Build) keeps design, procurement, logistics, and installation under one integrated team, with client sign-off required at each stage before work advances.
Approval before commitment. Sourcing before visualization. Installation coordinated from a single point of contact. That structure is what keeps the expensive surprises from landing in the final stretch, when there's no time left to absorb them.
Frequently Asked Questions
What are the standard dimensions for a commercial bar?
Bartender working surface height is typically 32.5 inches; guest-facing bar top height runs 42–44 inches. Underbar equipment depth ranges from 18.5–26 inches depending on manufacturer and model. Bartender aisle width should be at least 36 inches for one bartender, 48+ inches where two work simultaneously.
What is the most efficient layout for a commercial bar?
Straight/linear and L-shape layouts deliver the best service efficiency and staff movement for most operations. Island and U-shape configurations maximize seating capacity and visual impact but add bartender travel distance — making working zone organization even more critical in those formats.
What equipment is essential when building a commercial bar?
The non-negotiables: cocktail station with ice bin and speed rail, handwash sink, three-compartment sink, glass rinser, commercial ice maker, back bar refrigeration, and a POS system. All of these must be specified before bar die dimensions are finalized.
How much does it cost to design and build a commercial bar?
Costs vary based on size, materials, location, and local labor rates. The major drivers are equipment, custom millwork, plumbing rough-in, and finish materials. Get itemized estimates based on your specific layout and equipment list — per-linear-foot figures rarely reflect real project costs.
How long does it take to design and build a commercial bar?
From design sign-off through permitting, construction, and opening typically runs several months at minimum — longer for complex builds. Equipment lead times, particularly for custom underbar fabrication and draft systems, are the most frequently underestimated variable when setting an opening date.
Do I need an interior designer to build a commercial bar?
Some owners manage with contractor support alone, but a hospitality designer with commercial bar experience brings expertise in equipment sequencing, material durability, code compliance, and brand cohesion that prevents costly mid-construction corrections. For boutique hotel bars and high-end concepts, avoidable errors routinely cost more than the design fee itself.